i have officially imported all my content to my wordpress account and have it looking quasi-organized. woot! so do me a favor and head on over there sometime and add me to your reader, assuming you still like me. :)
all my old posts and everyone's comments were imported. all the "reply" comments are listed as their own comment, so now it looks as if i weirdly interjected thank you's and random advice, but i think i can live with that.
for anyone who is wondering, the switch was super easy! i'll have to manually set up my pages sections with my finished projects and such, and figure out how to put badges on my sidebar... so bear with me as i work out the kinks.
i also went over to bloglovin and imported all the blogs i had on google reader. that also took seconds once i found the "import" button, now prominently displayed. since g-reader is going the way of the dinosaur i didn't want to lose all the great blogs i love to follow.
see you over at wordpress... please, please, pretty please!!!
—lisa g.
Friday, March 15, 2013


Thursday, March 14, 2013
i'm moving! blogspace, that is...
[UPDATE: easier than i thought! here's my new address... come check it out and update your readers!!!]
okay folks... today. today! i am moving over to wordpress, with or without a glass of wine in hand. it seems pretty easy to do, wish me luck! my blog address will be the same, just wordpress instead of blogger. so, if i stop showing up in your feed you'll know where to find me.
i have a slight lull in my sewing due to the fact that our heater went out over the past weekend and we've been heating our not so well insulated house with a few space heaters. now, my sewing room never had central heat (it's a weird poorly built addition to the house) so i've always had a space heater to keep it warm. but due to the lack-of-heat situation i have to sacrificed my sewing room heat in order to keep our actual living space warm-ish. it was okay over the last few days when our temps made it to 50s F, but today we're hovering in the 30s F and my hands are shivering... it may not be fixed until next week due to the freak snowstorm we had last week, dumping us with another 2 feet of snow. seriously. can we just get on to spring already? we are told that all those heater fixing people with the gas company are working in high priority regions where there was flooding and coastal erosion and such. what do i know? i just want heat!

while my sewing room is a literal icebox i have started prep work on the grainline studio archer button up. woot! i printed and taped last night, traced this morning and hope to cut my fabric today or tomorrow. that is if my hands are steady enough. this was probably the most it really needs to be precise .pdf pattern i've done. initially i had a bit of a problem, it seems as though my printer cuts off the top and bottom of each pattern page leaving me to guess exactly how to connect those sides of the page. i came up with a brilliant (if i do say so) solution.

since the sides of each page printed fine, i simply traced the the square that connects each page to the next, then used it as a guide to line up the edges that didn't print. whew!

alright folks... see you on the other side!
—lisa g.
okay folks... today. today! i am moving over to wordpress, with or without a glass of wine in hand. it seems pretty easy to do, wish me luck! my blog address will be the same, just wordpress instead of blogger. so, if i stop showing up in your feed you'll know where to find me.
i have a slight lull in my sewing due to the fact that our heater went out over the past weekend and we've been heating our not so well insulated house with a few space heaters. now, my sewing room never had central heat (it's a weird poorly built addition to the house) so i've always had a space heater to keep it warm. but due to the lack-of-heat situation i have to sacrificed my sewing room heat in order to keep our actual living space warm-ish. it was okay over the last few days when our temps made it to 50s F, but today we're hovering in the 30s F and my hands are shivering... it may not be fixed until next week due to the freak snowstorm we had last week, dumping us with another 2 feet of snow. seriously. can we just get on to spring already? we are told that all those heater fixing people with the gas company are working in high priority regions where there was flooding and coastal erosion and such. what do i know? i just want heat!

while my sewing room is a literal icebox i have started prep work on the grainline studio archer button up. woot! i printed and taped last night, traced this morning and hope to cut my fabric today or tomorrow. that is if my hands are steady enough. this was probably the most it really needs to be precise .pdf pattern i've done. initially i had a bit of a problem, it seems as though my printer cuts off the top and bottom of each pattern page leaving me to guess exactly how to connect those sides of the page. i came up with a brilliant (if i do say so) solution.

since the sides of each page printed fine, i simply traced the the square that connects each page to the next, then used it as a guide to line up the edges that didn't print. whew!

alright folks... see you on the other side!
—lisa g.
Tuesday, March 12, 2013
oh my darlin'... ranges!
guys, i've been dying to share this dress with you! i have for ages drooled over the darling range dresses you all have made, but i'm cheap and it's hard for me to buy an expensive pattern and then still have to go buy fabric. i start adding up the costs in my head: pattern... fabric... lining... thread... buttons... then i go buy a simplicity pattern on the cheap and complain about how sucky it is. i really need to be convinced that a $20 pattern will get substantial use before i buy it. since i have so many different versions of this dress floating around in my head, i think it's worth the expense.
that said, a while back julie over at fabric mart contacted me about doing a guest post on their blog—fabric mart fabricistas—if they sent me some fabric. sign me up! she pointed me toward some new rayon fabrics and the darling ranges instantly came to mind. it was a match made in heaven if i do say so myself.

so here she is... new favorite dress! head on over to the fabric mart blog to see my write up there, then come back and see how i made the bodice adjustments!

much discussed over here is how wonky i am proportioned. i'm 5'8" which is certainly taller than average. in fact i have four sisters who are all 2-5" shorter than me. however, most of my height is in my legs making it so that i'm rather petite on top. i have a high bust, spindly arms, and have always had trouble finding necklines that aren't indecent and armholes that don't gape wide open. side boob is just not a classy look for me. i've finally come to the conclusion that, more often than not, i need to do a petite adjustment above the bust, then re-add the length under the bust. if you happen to need a similar adjustment, it's very easy to do. here's how...
pick a point above the bust (about 1/3 the way up the armscye) and fold out the amount you need to shorten by all the way around (i took out 3/4").
then, smooth out the armscye curve and you're good to go!

once i pinned out the room and tried the bodice back on it just fit and felt right; the neckline hit in a good place, the darts were in the right place, the arm hole wasn't gaping. success! a few tweaks here and there, okay a lot of tweaks... and i had a bodice i was happy with. i decided to leave this fitted but still everyday comfortable. i left off the back ties and added darts, and i lengthened the bodice to hit my high waist. mostly i'll wear the dress belted so i left about 2" of ease at the waist. i did add lining to the skirt portion; since the fabric has a white background i didn't think i could get away without it on a sunny day.

i am loving how this dress came out and i have ideas for a few more... sleeveless, short sleeved, scoop-necked... i really need to get more megan nielson patterns!
—lisa g.
that said, a while back julie over at fabric mart contacted me about doing a guest post on their blog—fabric mart fabricistas—if they sent me some fabric. sign me up! she pointed me toward some new rayon fabrics and the darling ranges instantly came to mind. it was a match made in heaven if i do say so myself.

so here she is... new favorite dress! head on over to the fabric mart blog to see my write up there, then come back and see how i made the bodice adjustments!

much discussed over here is how wonky i am proportioned. i'm 5'8" which is certainly taller than average. in fact i have four sisters who are all 2-5" shorter than me. however, most of my height is in my legs making it so that i'm rather petite on top. i have a high bust, spindly arms, and have always had trouble finding necklines that aren't indecent and armholes that don't gape wide open. side boob is just not a classy look for me. i've finally come to the conclusion that, more often than not, i need to do a petite adjustment above the bust, then re-add the length under the bust. if you happen to need a similar adjustment, it's very easy to do. here's how...
pick a point above the bust (about 1/3 the way up the armscye) and fold out the amount you need to shorten by all the way around (i took out 3/4").
 |
| obviously this is a not-to-scale drawing |
then, smooth out the armscye curve and you're good to go!

once i pinned out the room and tried the bodice back on it just fit and felt right; the neckline hit in a good place, the darts were in the right place, the arm hole wasn't gaping. success! a few tweaks here and there, okay a lot of tweaks... and i had a bodice i was happy with. i decided to leave this fitted but still everyday comfortable. i left off the back ties and added darts, and i lengthened the bodice to hit my high waist. mostly i'll wear the dress belted so i left about 2" of ease at the waist. i did add lining to the skirt portion; since the fabric has a white background i didn't think i could get away without it on a sunny day.

i am loving how this dress came out and i have ideas for a few more... sleeveless, short sleeved, scoop-necked... i really need to get more megan nielson patterns!
—lisa g.
Monday, March 11, 2013
moss mini AND dolman tee
so i made a green corduroy skirt eons ago and never really liked it all that much. (i hesitate to link to it, but here you go) i think i wore it once, altered it a bit, then chucked it into the closet never to be seen again. until recently... i unearthed it from the bottom of a pile of sweaters and thought maybe i should do something with it. there was a decent amount of fabric and the moss mini from grainline studio came to mind. i bought the pattern and lo and behold, it just fit! the original skirt had buttons down the front so i decided to keep them and not mess with a zipper.

i didn't bother to muslin this, i figured if it didn't fit i can call this my muslin and still be okay with that. happily it does fit well enough to be worn. yay! i measured a size 8 so that's what i cut. it still seems a little snug in the hips, but it is a mini skirt, so i think it's okay. the waist was a little gaping in the back so i took in the back yoke by a small amount to curve around le boo-tay.

as you all know, this skirt lives up to it's name as a mini skirt. i cut the skirt to the longest length then made a faced hem with bias tape i reclaimed from the original skirt. also—polka dot pocket lining!


the only other fitting tweak i need to work out is that space below the waist but above my hips. i'm not sure if i have proportionally low hips or what, but that area above the pocket is just kind of floating out there. i've had this problem before, so i guess i need to pay more attention to it. since i was using an existing button down skirt i couldn't sew the pocket lining into the fly as the pattern instructs and i think that would have helped to pull that part in closer to the body. no worries, there will be a next time with this pattern.

i had to piece the waistband because it was a hair too short... we'll just call it a design feature. oh, and i added back pockets and belt loops because i thought it needed them.

fortunately the small fit issues i have don't render the skirt useless. i had some purple cotton lycra knit so i decided to make cation designs dolman tee. i've seen these pop up over the past months and while i liked it, i wasn't sure if it was the right style for my figure. i always feel like my shoulders stick out funny and the lack of shoulder seam can exaggerate it. however, i am happy to say i think this top is not only supremely comfortable, but also flattering!

when i printed the pattern the scale was off (i got 3.5" for the 4" square) so i took an existing knit tee pattern and picked my size based off that. it all worked out and i think this is my new favorite tee! it was wicked fast to sew and would have been even faster to cut, however i had less than a yard of fabric so i had to do some fancy maneuvering. i cut the hem band in two pieces and had to cut the sleeve bands with the grain. i had plenty of stretch going both directions so it worked out fine. also i did a neck binding instead of band. i like the wide neck slouchy look for this.

so look at that, a whole outfit in one weekend! both projects were super fast and i love how they go together. can't wait to try more grainline patterns, i just bought fabric for an archer blouse. so excited for that one!!!
—lisa g.

i didn't bother to muslin this, i figured if it didn't fit i can call this my muslin and still be okay with that. happily it does fit well enough to be worn. yay! i measured a size 8 so that's what i cut. it still seems a little snug in the hips, but it is a mini skirt, so i think it's okay. the waist was a little gaping in the back so i took in the back yoke by a small amount to curve around le boo-tay.

as you all know, this skirt lives up to it's name as a mini skirt. i cut the skirt to the longest length then made a faced hem with bias tape i reclaimed from the original skirt. also—polka dot pocket lining!


the only other fitting tweak i need to work out is that space below the waist but above my hips. i'm not sure if i have proportionally low hips or what, but that area above the pocket is just kind of floating out there. i've had this problem before, so i guess i need to pay more attention to it. since i was using an existing button down skirt i couldn't sew the pocket lining into the fly as the pattern instructs and i think that would have helped to pull that part in closer to the body. no worries, there will be a next time with this pattern.

i had to piece the waistband because it was a hair too short... we'll just call it a design feature. oh, and i added back pockets and belt loops because i thought it needed them.

fortunately the small fit issues i have don't render the skirt useless. i had some purple cotton lycra knit so i decided to make cation designs dolman tee. i've seen these pop up over the past months and while i liked it, i wasn't sure if it was the right style for my figure. i always feel like my shoulders stick out funny and the lack of shoulder seam can exaggerate it. however, i am happy to say i think this top is not only supremely comfortable, but also flattering!

when i printed the pattern the scale was off (i got 3.5" for the 4" square) so i took an existing knit tee pattern and picked my size based off that. it all worked out and i think this is my new favorite tee! it was wicked fast to sew and would have been even faster to cut, however i had less than a yard of fabric so i had to do some fancy maneuvering. i cut the hem band in two pieces and had to cut the sleeve bands with the grain. i had plenty of stretch going both directions so it worked out fine. also i did a neck binding instead of band. i like the wide neck slouchy look for this.

so look at that, a whole outfit in one weekend! both projects were super fast and i love how they go together. can't wait to try more grainline patterns, i just bought fabric for an archer blouse. so excited for that one!!!
—lisa g.
Monday, March 4, 2013
some bloggity business
there's been loads of discussion around the blogs about how much the blogger platform stinks. i feel as though i've been fighting with blogger since day one, whether it's about getting my posts formatted correctly, uploading pics, commenting (darn you captcha!), and just generally not working when i need it to. when i started this blog i wavered between blogger and word press and claimed my blog name at both spots. blogger won out because it seemed less confusing to set up and more customizable. basically i've regretted it ever since.
 |
| my fist blog-posted renfrew! shameful it's taken so long, but i figure everyone is sick of this pattern by now. |
so i've decided to switch over to word press at some point when i have time to deal with that and hopefully it won't be too traumatic. i am concerned that, because this is a picture heavy blog, that those might get lost. and that would be soul crushing.
 |
| this is a nice drape-y rayon with a subtle sheen. not great for hiding the lumps and bumps, but it's super soft, so i'll deal. |
regardless, i will switch and the switch will probably happen on a whim late some night after one too many glasses of wine... so if you wake up to some weird feed of mine in your reader, i'm apologizing now!
 |
| paired with my thurlows... it was only right. i left off the sleeve and hem bands and lengthened the hem to compensate and just cut the sleeves where i wanted them and twin needled the hems. |
also, i'm just wondering what ya'll do with your pictures in general. i take what seems like a bazillion pics just to get one or two where i don't look like a complete doofus. i try to make sure and delete the pics off my computer that i will definitely never use, but sometimes i'm in a hurry and think i'll come back to it later. guess what. i never do.
 |
| the pattern's neck band was too long for this knit and it stuck out all sorts of awkward. had to rip it out and redo. love that... but now it's nice and profesh looking. |
so now i have thousands of pictures of myself in iphoto, which makes me cringe every time i open the program because i HATE having my picture taken. i'm awkward, i don't photograph well, i'm super self-conscious, i don't know where to put my hands, ahhh!!!!

right now i have to upload them to picasa first in order to put them on the blog. but it... takes... forever... and they're really hard to organize. i use flicker occasionally but only have a few pics there. i haven't come up with a good way of storing my pics, but i really have no need to keep them for the long-term if they're on the blog, right? i just don't know! what do you guys do????
—lisa g.
—lisa g.
Wednesday, February 27, 2013
tiramisu success!
thanks a million for all the helpful suggestions on my plea for help last week! i suppose i was having a mini sewing-related meltdown... i know you all are above such, yes? no?! ha! anyways, i really appreciate the feedback. seriously, you sewing peeps are the best.
and, as if you didn't know... photographing a black dress is super duper hard!!!

so here's what i decided to do: even though my pattern printed off-scale at 7/8" for every 1" (i believe that's 12% smaller, fyi) i went with the size i measured (bodice 30 C). now, i'm not a C cup, but all the information i found led me to believe that i should go with my measurement and not my usual cup size. that said, i probably could have gone with a 30 B. for the midriff and skirt i chose the waist size 30 and cut the length one size up. i'm definitely taller than the target size. instead of sewing at the drafted 1/2" SA i serged most of my seams with a 3/8" SA. for reference, my measurements are as follows...
high: 32
full: 33.5
under: 30
waist: 29
the only changes i made to the pattern itself were to eliminate the neckline and sleeve bands. i have nothing against the bands, but for this i wanted a slightly dressier look. i added 1/2" to the neckline to compensate for the bands, then serged clear elastic to the edge from the wrong side, then turned and topstitched the edge. i really like how this worked; it gave me a very fast clean finish. for the sleeve hem i turned it in 1/2" and hemmed before sewing up the side seams.

the bodice fit pretty well without too much fiddling. i didn't crossover the neckline as much as the pattern calls for (my CF notches are about 1" apart) because it looked so closed up on me. actually my only real disappointment with this pattern (which may not be the pattern's fault) is that the neckline is too small to lay flat around my neck. i could (and may) widen the neckline slightly to eliminate the wrinkling i'm getting, but i'm going to wear the dress a bit before i go in and perform surgery on it.
this pattern has you cut the entire bodice and skirt on the bias, but since i was using a solid color i decided to cut the bodice on the straight (placing the back piece on the fold to eliminate the back seam). based on everyone's suggestions i left the skirt bias cut. i'm not entirely convinced that cutting the skirt on the bias is necessary to get the nice drape since this is a knit, but i think in the end it helped save on fabric. i had two yards of this fabric which, after washing, was much, much less. i don't think i could have cut both skirt pieces and the back bodice on the fold.
i decided to leave off the pockets partially out of laziness, but mostly because the only things i stash in my pockets are kleenex, not good with black fabric; and my iphone, which would be too heavy and pull at the skirt funny. i do kind of wish i had a place to stash my hands though, i never know what to do with them when i'm not holding a child.
i wish i could comment more on the actual pattern sizing, but i do know i would have ended up taking this dress in quite a bit. the pattern recommends sizing down for a snug fit and that is basically what my mis-printed pattern gave me. in fact, i think the printing mishap ended up saving me a lot of unpicking and resewing. so i guess that's a win!

my final thoughts: i can really appreciate what steph is doing with cake patterns. the whole multi-sized bodice thing is a fantastic idea and i think she's really on to something. that said, i just don't feel the need to fiddle so much with the sizing on a knit pattern. there is a lot of ease built into this dress and i wonder if that just causes more problems than it solves. however i look forward to seeing how her business and patterns evolve; obviously this pattern has been a breakaway hit, and there is no doubt that i really, really love this dress! it checks all the boxes of wardrobe staple, versatile, comfortable, everyday wearable, works with a cardigan... i could go on. i do want to make a stripy version to take advantage of the cheveron effect of the skirt and bodice... in fact this was such a quick dress to sew up i have no doubt that i'll be making more!
—lisa g.
and, as if you didn't know... photographing a black dress is super duper hard!!!

so here's what i decided to do: even though my pattern printed off-scale at 7/8" for every 1" (i believe that's 12% smaller, fyi) i went with the size i measured (bodice 30 C). now, i'm not a C cup, but all the information i found led me to believe that i should go with my measurement and not my usual cup size. that said, i probably could have gone with a 30 B. for the midriff and skirt i chose the waist size 30 and cut the length one size up. i'm definitely taller than the target size. instead of sewing at the drafted 1/2" SA i serged most of my seams with a 3/8" SA. for reference, my measurements are as follows...
high: 32
full: 33.5
under: 30
waist: 29
the only changes i made to the pattern itself were to eliminate the neckline and sleeve bands. i have nothing against the bands, but for this i wanted a slightly dressier look. i added 1/2" to the neckline to compensate for the bands, then serged clear elastic to the edge from the wrong side, then turned and topstitched the edge. i really like how this worked; it gave me a very fast clean finish. for the sleeve hem i turned it in 1/2" and hemmed before sewing up the side seams.

the bodice fit pretty well without too much fiddling. i didn't crossover the neckline as much as the pattern calls for (my CF notches are about 1" apart) because it looked so closed up on me. actually my only real disappointment with this pattern (which may not be the pattern's fault) is that the neckline is too small to lay flat around my neck. i could (and may) widen the neckline slightly to eliminate the wrinkling i'm getting, but i'm going to wear the dress a bit before i go in and perform surgery on it.
this pattern has you cut the entire bodice and skirt on the bias, but since i was using a solid color i decided to cut the bodice on the straight (placing the back piece on the fold to eliminate the back seam). based on everyone's suggestions i left the skirt bias cut. i'm not entirely convinced that cutting the skirt on the bias is necessary to get the nice drape since this is a knit, but i think in the end it helped save on fabric. i had two yards of this fabric which, after washing, was much, much less. i don't think i could have cut both skirt pieces and the back bodice on the fold.
 |
| over-exposed pic to show detail |
i decided to leave off the pockets partially out of laziness, but mostly because the only things i stash in my pockets are kleenex, not good with black fabric; and my iphone, which would be too heavy and pull at the skirt funny. i do kind of wish i had a place to stash my hands though, i never know what to do with them when i'm not holding a child.
 |
| ditto |
i wish i could comment more on the actual pattern sizing, but i do know i would have ended up taking this dress in quite a bit. the pattern recommends sizing down for a snug fit and that is basically what my mis-printed pattern gave me. in fact, i think the printing mishap ended up saving me a lot of unpicking and resewing. so i guess that's a win!

my final thoughts: i can really appreciate what steph is doing with cake patterns. the whole multi-sized bodice thing is a fantastic idea and i think she's really on to something. that said, i just don't feel the need to fiddle so much with the sizing on a knit pattern. there is a lot of ease built into this dress and i wonder if that just causes more problems than it solves. however i look forward to seeing how her business and patterns evolve; obviously this pattern has been a breakaway hit, and there is no doubt that i really, really love this dress! it checks all the boxes of wardrobe staple, versatile, comfortable, everyday wearable, works with a cardigan... i could go on. i do want to make a stripy version to take advantage of the cheveron effect of the skirt and bodice... in fact this was such a quick dress to sew up i have no doubt that i'll be making more!
—lisa g.
Thursday, February 21, 2013
i need opinions!!!
i'm just about to start work on the tiramisu dress but first need to vent and also ask a few opinions...
so i have some black cotton lycra from girlcharlee.com that i ordered with the intent of making a knit LBD. a while back an opportunity came up for some free tickets to attend the BSO. i ended up sending my husband because it was cold and i decided against wandering around the streets of boston late at night with two kids. i always get lost and the subway system confuses me... what can i say. i'm from the midwest—i drive places damnit. it also dawned on me that i really don't have anything appropriate to wear. i suddenly needed a black dress. i'm of an age where i should absolutely have a black dress, but sadly don't. so i took a gamble and ordered black knit fabric online and thank the heavens it is exactly the weight and drape i wanted.
i want to use the tiramisu pattern because it has that right mix of casual if you wear it one way, or dressy if you wear it another. i plan to eliminate the sleeve bands and just hem the sleeves, and will probably eliminate the neck bands in favor of serging some clear elastic to the inside, turning, then topstitching. i'm pretty sure i've seen this done with great results, though i'll test some scraps first just to make sure.
so here's my vent: i went with the .pdf version off craftsy partly to save money, and partly (mostly) because i'm impatient. i've done plenty of .pdf patterns so i know what i'm getting into there. i go to print the pattern and it's 65 pages long. what the what?! wow. that's a loooooot of pages. now i knew that there are multiple sizes that you customize based on upper bust and full bust measurements, but there's no good way to print only the bodice size you need.
now, i don't know a whole lot about putting together a .pdf pattern so i'm speaking only from the customer end here, but it would really have been helpful to separate the bodice sizes so you have the option to print only the size you need. i wasted so much paper. i also have a beef with the scaling. my 1" square comes out to 7/8". i had tested this with one page and worked out what percentage to print at, but for some reason when i went to print the entire pattern, it didn't scale. so now i'm stuck with 55 pattern pages that are the wrong scale. i felt so defeated before i even laid out my pages! it was just so much to dig through. basically i'm saying: pay the extra $5 and get the paper pattern.
i figured out that the off scale essentially makes my pattern one size smaller. she notes that for a snug fit to go down a size, so this should work out okay? my fabric is really stretchy, and i've seen people cut out loads of room from the side and under bust seams. the SA is 1/2" and i can sew it with 1/4" SA just for extra insurance. this sounds reasonable, right?
okay, last question: the bodice and skirt is cut on the bias, presumably so that you can have fun with stripes. i would really prefer to eliminate the CB bodice seam and the CB and CF skirt seams and cut these pieces on the fold. since i'm using a solid, do i need to cut these pieces on the bias? i just don't see any obvious reason to. plus i only have 2 yds of fabric so i'm not sure i'll have quite enough for all the bias cutting.
thoughts? lay those opinions on me!!!
—lisa g.
Wednesday, February 20, 2013
collar stay channel tutorial
one thing my husband likes on his dress shirts are channels for collar stays. it's pretty easy to figure out by looking at a dress shirt that already has this feature, but here you go anyways!

[sorry for the following pictures to be of such poor quality. not enough sunlight, having a difficult to photograph fabric, and this ungodly orange table that i sew on are all on my list of excuses. actually, i really love the orange table. in fact i painted it that color long before i ever knew it might serve as a background for photographs.]
first cut two under collar pieces. if you don't have enough fabric to cut the second one in one piece, just cut out two halves; you really only need the outer thirds of this piece. take one of your under collar pieces and mark a line from the collar point angling up the direction you want the channel. then mark 1/4" on each side to give you a 1/2" wide channel. fold down the corner of the collar that attaches to the stand. as you do all this, make sure you check where the seam allowances will fall so that you keep the entire channel opening free from the collar stand once it is all sewn together. once you are confident you have this all worked out, trim away all but 1/2" of the folded under bit.

now you need to fill in the gap that you just folded over, so take the second under collar piece and position it under the first so that it fills in the gap. if you are not using an entire under collar and had to piece it, check the position against your pattern piece to make sure it all lines up correctly.

pin it all in place then edge stitch turning when you get to the stay channel. do this on both sides of the channel. you can trim away what you don't need of the back layer so it only covers the channel, or you can leave the entire piece attached. if you do this, i would suggest trimming off the seam allowance to reduce bulk. depending on what you like to use for stabilizing the collar this under piece could take the place or add to whatever stabilization method you prefer. i didn't trim much at this point, but later i did trim some bulk out of the point. just something to watch for. after all that is done proceed as normal to construct your collar.
i also wanted to show you what a difference it made in my collar construction by cutting the under collar smaller and stretching it as i sewed. the collar naturally curves and ultimately gives you a smoother line. had i trimmed as much width from the under collar as i was supposed to, the curve would be even more pronounced.

i was impressed anyways.
—lisa g.

[sorry for the following pictures to be of such poor quality. not enough sunlight, having a difficult to photograph fabric, and this ungodly orange table that i sew on are all on my list of excuses. actually, i really love the orange table. in fact i painted it that color long before i ever knew it might serve as a background for photographs.]
first cut two under collar pieces. if you don't have enough fabric to cut the second one in one piece, just cut out two halves; you really only need the outer thirds of this piece. take one of your under collar pieces and mark a line from the collar point angling up the direction you want the channel. then mark 1/4" on each side to give you a 1/2" wide channel. fold down the corner of the collar that attaches to the stand. as you do all this, make sure you check where the seam allowances will fall so that you keep the entire channel opening free from the collar stand once it is all sewn together. once you are confident you have this all worked out, trim away all but 1/2" of the folded under bit.

now you need to fill in the gap that you just folded over, so take the second under collar piece and position it under the first so that it fills in the gap. if you are not using an entire under collar and had to piece it, check the position against your pattern piece to make sure it all lines up correctly.

pin it all in place then edge stitch turning when you get to the stay channel. do this on both sides of the channel. you can trim away what you don't need of the back layer so it only covers the channel, or you can leave the entire piece attached. if you do this, i would suggest trimming off the seam allowance to reduce bulk. depending on what you like to use for stabilizing the collar this under piece could take the place or add to whatever stabilization method you prefer. i didn't trim much at this point, but later i did trim some bulk out of the point. just something to watch for. after all that is done proceed as normal to construct your collar.
i also wanted to show you what a difference it made in my collar construction by cutting the under collar smaller and stretching it as i sewed. the collar naturally curves and ultimately gives you a smoother line. had i trimmed as much width from the under collar as i was supposed to, the curve would be even more pronounced.

i was impressed anyways.
—lisa g.
Sunday, February 17, 2013
mccalls 6044 version 3.0
so last weekend we hunkered down for the
during which time not only was it difficult to leave the house, we were expressly forbidden to at risk of fine and/or imprisonment. not kidding! not that i had any intention of driving around in a blizzard, but there you have it. we got 2 feet of snow and literally had to dig our way out the front door.

so what's a girl to do while snow is falling at an alarming rate? why sew, of course!

i already had this dress shirt cut and fused and waiting for it's turn under my needle. after cutting the shirt i perused david coffin's "shirtmaking" and wanted to employ some of his techniques. while i didn't strictly adhere to his method on all points, i did pay close attention to how he does the shirt collar. while i haven't achieved perfection here, it was interesting to see how such small changes improved my collar attempt so dramatically! to me at least.

i'm not going to detail a full rundown of his methods, mostly because he does such a great job of it in his book, but also because duh! he wrote a book and it's hardly fair for me to just put it all out there on the internet. if you're not interested in owning a copy, most likely you can find it at a library. my library has a great inter-library loan service so i can get virtually any book i need. that's how i tracked down this source, though i plan to buy a copy soon to have on hand.
to start, he gives you several different seam allowances to work with. he suggests 1/4" for most parts of the collar (except the edge of the collar that attaches to the stand—that you leave 5/8") which allows for more control and accuracy. i find 1/4" difficult to stitch because it falls under my presser foot, which i obviously can't see, so i went with a 3/8" SA.
he also suggests trimming width off the under collar and inner collar stand, so the under or inner side of these pieces are 1/4"-1/2" smaller than their counterpart. i find it interesting that he has you stretch the smaller piece as you sew to fit the larger piece. what i have seen before, say in tailoring a coat or jacket, is to cut the outer pieces larger then ease them down to the smaller size. do you see the difference? it's subtle, but it really works well. when you let go, the collar just naturally curves itself! very cool. i was a bit nervous and didn't trim as much as he suggested so i still have a few wrinkles. next time i'll follow more closely for sure.

i always had issues getting the rounded edge at the front on the collar stand to look good. i could never figure out when to sew that little curved bit and thankfully, coffin address this very well. no more guessing for me! all in all, the collar on this shirt is much more crisp and formed than my previous attempts. i still need some work on my collar points. i may need to invest in one of these.
i'm still not great at flat felling. i had removed most of the ease in the sleeve cap because it's quite unnecessary here and makes felling even more difficult. i think with practice i'll get a little quicker at it, but i spent f-o-r-e-v-e-r putting those sleeves in and felling them. the side seams, by contrast went super fast. it's still tedious to get all the way up or down those sleeves, but using my new felling foot at least got my stitching far more even.

another thing i found interesting was how coffin recommended a very short stitch length. i had noticed while examining my husband's rtw shirts that the topstitching was done with a very short stitch, so i did this on the last shirt, but he suggests that you do all your construction with a much shorter stitch. his argument is that the shorter stitch uses more thread to go up and down with each stitch which enables the fabric to retain some of it's natural give. i noticed that i was getting slight puckering in my seams, but dialing down the tension a touch took care of that.

there are still minor changes i'll make next time around: widening the button placket (coffin recommends 1 1/4", this one is 1"), turning the under button placket to the inside instead of the outside, widening the back pleat, etc. i do feel pretty good having made three dress shirts this year, and it's only mid-february! i know more will be on my plate before long, but these are a good start. actually, i wouldn't mind making one for myself. each time i make one i keep thinking, you know with leggings and a belt i think i could wear this... focus lisa, FOCUS!
—lisa g.
BLIZZARD OF 2013!!!
during which time not only was it difficult to leave the house, we were expressly forbidden to at risk of fine and/or imprisonment. not kidding! not that i had any intention of driving around in a blizzard, but there you have it. we got 2 feet of snow and literally had to dig our way out the front door.

so what's a girl to do while snow is falling at an alarming rate? why sew, of course!

i already had this dress shirt cut and fused and waiting for it's turn under my needle. after cutting the shirt i perused david coffin's "shirtmaking" and wanted to employ some of his techniques. while i didn't strictly adhere to his method on all points, i did pay close attention to how he does the shirt collar. while i haven't achieved perfection here, it was interesting to see how such small changes improved my collar attempt so dramatically! to me at least.

i'm not going to detail a full rundown of his methods, mostly because he does such a great job of it in his book, but also because duh! he wrote a book and it's hardly fair for me to just put it all out there on the internet. if you're not interested in owning a copy, most likely you can find it at a library. my library has a great inter-library loan service so i can get virtually any book i need. that's how i tracked down this source, though i plan to buy a copy soon to have on hand.
 |
| i'm just going to call that last buttonhole stitched in green my signature okay? |
to start, he gives you several different seam allowances to work with. he suggests 1/4" for most parts of the collar (except the edge of the collar that attaches to the stand—that you leave 5/8") which allows for more control and accuracy. i find 1/4" difficult to stitch because it falls under my presser foot, which i obviously can't see, so i went with a 3/8" SA.
he also suggests trimming width off the under collar and inner collar stand, so the under or inner side of these pieces are 1/4"-1/2" smaller than their counterpart. i find it interesting that he has you stretch the smaller piece as you sew to fit the larger piece. what i have seen before, say in tailoring a coat or jacket, is to cut the outer pieces larger then ease them down to the smaller size. do you see the difference? it's subtle, but it really works well. when you let go, the collar just naturally curves itself! very cool. i was a bit nervous and didn't trim as much as he suggested so i still have a few wrinkles. next time i'll follow more closely for sure.

i always had issues getting the rounded edge at the front on the collar stand to look good. i could never figure out when to sew that little curved bit and thankfully, coffin address this very well. no more guessing for me! all in all, the collar on this shirt is much more crisp and formed than my previous attempts. i still need some work on my collar points. i may need to invest in one of these.
|
| i hope to make up a "how-to" for the collar stay channel soon... |
i'm still not great at flat felling. i had removed most of the ease in the sleeve cap because it's quite unnecessary here and makes felling even more difficult. i think with practice i'll get a little quicker at it, but i spent f-o-r-e-v-e-r putting those sleeves in and felling them. the side seams, by contrast went super fast. it's still tedious to get all the way up or down those sleeves, but using my new felling foot at least got my stitching far more even.

 |
| inside felled armhole |
 |
| inside felled sleeve seam |
another thing i found interesting was how coffin recommended a very short stitch length. i had noticed while examining my husband's rtw shirts that the topstitching was done with a very short stitch, so i did this on the last shirt, but he suggests that you do all your construction with a much shorter stitch. his argument is that the shorter stitch uses more thread to go up and down with each stitch which enables the fabric to retain some of it's natural give. i noticed that i was getting slight puckering in my seams, but dialing down the tension a touch took care of that.

there are still minor changes i'll make next time around: widening the button placket (coffin recommends 1 1/4", this one is 1"), turning the under button placket to the inside instead of the outside, widening the back pleat, etc. i do feel pretty good having made three dress shirts this year, and it's only mid-february! i know more will be on my plate before long, but these are a good start. actually, i wouldn't mind making one for myself. each time i make one i keep thinking, you know with leggings and a belt i think i could wear this... focus lisa, FOCUS!
—lisa g.
Thursday, February 7, 2013
thurlow in denim
for months i've wanted to make some thurlow pants, and i finally got around to it! i went with a denim because i found some for a great price. basically (not including the pattern) these pants cost me less than $10. that's a definite win in my book!

i measure a straight size 6, but when i used this pattern before i went with a size 4. there is still plenty of room for these to be comfortable, in fact i've already spent two full days wearing them. i love this type of pant because i can look nice without being dressed up.
any changes i made are subtle. i changed the order of construction slightly, using the method i learned from the jalie jeans pattern. it allows you to construct the fly without having the back of the pants attached yet. once the fly is constructed, and the back pieces are sewn together, you sew front to back by sewing the entire inseam and then the side seams. i really like this for a few reasons. first, you can topstitch the crotch flat, you can topstitch the inseam, and you can adjust the legs as needed to get the fit you want.

my denim is a little heavy and bulky so i needed my seam allowances to be controlled as much as possible, hence all the topstitching. i was concerned that my topstitching would detract from the look, but you can barely see it because my fabric is so dark. fine by me!
i decided to go with a single inset welt for the back pockets. i felt the double welts were a little oversized and perhaps a touch low. i made the single welt where the top of the double welt would be, if that makes any sense. i used poppykettle's fab tutorial to make my pockets and they turned out perfect. i also added a button hole just as extra insurance against unsightly back pocket gaping.

as i mentioned in my last post, i adjusted the fly extension piece so that my waistband would line up correctly and everything would be in it's proper place. i ended up trimming off the extra seam allowance in the back. as i said before, my denim is fairly heavy and it was just creating unnecessary bulk. i fit a straight size 4 so i think in the future i'll just trim the excess out to begin with.
i added 1" in length and they are just a touch long for wearing flats, but i figure they'll shrink up as they get washed. i can always adjust the length later as needed.
as i've said before, this is a GREAT pattern. other than tweaking maybe the front crotch depth, i really have a good fit. hopefully i can get around to making another pair (or two or three or ten) because i could really use more pants!

okay, if you don't hear from me for a while it's because i've been buried in snow. we have 18-30" (45-76 cm for you metric types) of the stuff coming our way tomorrow through saturday. blizzard! so, i'm off to stock the pantry...
—lisa g.

i measure a straight size 6, but when i used this pattern before i went with a size 4. there is still plenty of room for these to be comfortable, in fact i've already spent two full days wearing them. i love this type of pant because i can look nice without being dressed up.
 |
| it does feel weird cropping out my head so i can properly show you my bum and then posting it on the internet... but whatevs. |
any changes i made are subtle. i changed the order of construction slightly, using the method i learned from the jalie jeans pattern. it allows you to construct the fly without having the back of the pants attached yet. once the fly is constructed, and the back pieces are sewn together, you sew front to back by sewing the entire inseam and then the side seams. i really like this for a few reasons. first, you can topstitch the crotch flat, you can topstitch the inseam, and you can adjust the legs as needed to get the fit you want.

my denim is a little heavy and bulky so i needed my seam allowances to be controlled as much as possible, hence all the topstitching. i was concerned that my topstitching would detract from the look, but you can barely see it because my fabric is so dark. fine by me!
i decided to go with a single inset welt for the back pockets. i felt the double welts were a little oversized and perhaps a touch low. i made the single welt where the top of the double welt would be, if that makes any sense. i used poppykettle's fab tutorial to make my pockets and they turned out perfect. i also added a button hole just as extra insurance against unsightly back pocket gaping.

as i mentioned in my last post, i adjusted the fly extension piece so that my waistband would line up correctly and everything would be in it's proper place. i ended up trimming off the extra seam allowance in the back. as i said before, my denim is fairly heavy and it was just creating unnecessary bulk. i fit a straight size 4 so i think in the future i'll just trim the excess out to begin with.
 |
| hammered in a shank button. p.s. the dritz jeans buttons suck big time. gonna have to find a different brand, these are nearly impossible to get in! |
i added 1" in length and they are just a touch long for wearing flats, but i figure they'll shrink up as they get washed. i can always adjust the length later as needed.
as i've said before, this is a GREAT pattern. other than tweaking maybe the front crotch depth, i really have a good fit. hopefully i can get around to making another pair (or two or three or ten) because i could really use more pants!

okay, if you don't hear from me for a while it's because i've been buried in snow. we have 18-30" (45-76 cm for you metric types) of the stuff coming our way tomorrow through saturday. blizzard! so, i'm off to stock the pantry...
—lisa g.
Saturday, February 2, 2013
it's not just you
guys, i've done a lot of un-selfish sewing lately, so it was time to sneak in a piece for myself before starting another dress shirt. i decided to make some denim thurlows. yeah, i blatantly copied not only the online sewing peeps who have made denim trousers, but even my own little sister who made a pair recently, sent me pics and generally rubbed it in my face that she made super awesome pants. really, they were so cute i just couldn't help myself anymore. i had to have my own. there's a fabric store nearby called sewfisticated (don't you just adore the name?) and every time i go there they have loads of bargains. they always have a table full of denim for $2.50/yd, and on my last visit i just couldn't pass it up. the denim they had was a little heavier than i would have preferred, but i think it still works just fine.
now, i made thurlow shorts way back when and when i did the fly, i noticed the fly extension seemed to not quite be in the right place. but i went along, leaving it as it was. then when it came time to put the waistband on, the waistband came up short. i assumed i just messed up somewhere. i made a quick fix, and all was good.
so this time around, i carefully followed the directions, and lo and behold—same problem. ah-ha! it wasn't me. it was gasp a flaw in the pattern! this time, i searched reviews because surely i wasn't the only one who came across this problem. nothing. then i asked my sister and yes! she too had the same thing happen to her. i have seen whisperings of waistbands coming up short, so i'm here to say: it's not just you! this time around, i decided to rip out all the stitching, take out the zip and start over. p.s. one of those little razor blades makes super fast work of stitch unpicking. a regular seam ripper would have taken me an hour; razor blade, less than two minutes. believe me, re-doing the zip was much less work than it sounds.

i know we all have a proclaimed love affair with sewaholic patterns, but for the sake of anyone making this pattern and having fly/waistband issues, i will stand here and be the one to let you know that there is indeed a teeny tiny mistake in either the fly extention piece or the directions. fortunately, it is a super easy fix.
if you need what you are sewing to look exactly like the directions, trim 5/8" off the width of the fly extension when you go to finish the long edge (or trim it from the pattern piece to begin with). after, you can continue following the directions and illustrations as they are.
if you are confident enough to have yours look slightly different, sew the zip at 5/8" in from the facing edge instead of lined up with it. then when you sew the zip and fly extension to the pant, line up the edge of the zip tape (instead of the edge of the facing) with the edge of the pant. i kind of like the facing to extend beyond the edge of the zip tape to minimize bulk, so that's what i did.
all in all, it's not a big deal. i do wish sewaholic would put a little note amending the pattern either as an insert or on the site somewhere, especially since we're talking about the fly. many people are using this pattern as their first try at pants and we're all assuming that we have erred somewhere. i love sewaholic and tasia is an absolute dear who works very hard and delivers an outstanding product, but just a teeny tiny little amendment would be fab.
that's my PSA for the day. carry on.
—lisa g.
now, i made thurlow shorts way back when and when i did the fly, i noticed the fly extension seemed to not quite be in the right place. but i went along, leaving it as it was. then when it came time to put the waistband on, the waistband came up short. i assumed i just messed up somewhere. i made a quick fix, and all was good.
so this time around, i carefully followed the directions, and lo and behold—same problem. ah-ha! it wasn't me. it was gasp a flaw in the pattern! this time, i searched reviews because surely i wasn't the only one who came across this problem. nothing. then i asked my sister and yes! she too had the same thing happen to her. i have seen whisperings of waistbands coming up short, so i'm here to say: it's not just you! this time around, i decided to rip out all the stitching, take out the zip and start over. p.s. one of those little razor blades makes super fast work of stitch unpicking. a regular seam ripper would have taken me an hour; razor blade, less than two minutes. believe me, re-doing the zip was much less work than it sounds.

i know we all have a proclaimed love affair with sewaholic patterns, but for the sake of anyone making this pattern and having fly/waistband issues, i will stand here and be the one to let you know that there is indeed a teeny tiny mistake in either the fly extention piece or the directions. fortunately, it is a super easy fix.
if you need what you are sewing to look exactly like the directions, trim 5/8" off the width of the fly extension when you go to finish the long edge (or trim it from the pattern piece to begin with). after, you can continue following the directions and illustrations as they are.
 |
| please note that i reversed my fly to the standard zip up with the right hand layout |
if you are confident enough to have yours look slightly different, sew the zip at 5/8" in from the facing edge instead of lined up with it. then when you sew the zip and fly extension to the pant, line up the edge of the zip tape (instead of the edge of the facing) with the edge of the pant. i kind of like the facing to extend beyond the edge of the zip tape to minimize bulk, so that's what i did.
all in all, it's not a big deal. i do wish sewaholic would put a little note amending the pattern either as an insert or on the site somewhere, especially since we're talking about the fly. many people are using this pattern as their first try at pants and we're all assuming that we have erred somewhere. i love sewaholic and tasia is an absolute dear who works very hard and delivers an outstanding product, but just a teeny tiny little amendment would be fab.
 |
| again, my zip is reversed from how the pattern is written that's just how i roll |
that's my PSA for the day. carry on.
—lisa g.
Wednesday, January 30, 2013
my first jean-like pants
i've made pants and shorts before, so i'm pretty comfortable with the whole process. still, i've put off making any actual jeans. but as with many of my sewing adventures, i try new stuff out on my kids first. i picked up this green stretch twill for pretty cheap and was dying to try out the famed jalie #2908. if you don't know jalie patterns, they specialize in all things stretchy and active, and each pattern comes in approximately 5,987,423 sizes. since i've been into tracing patterns lately, i was okay with this.

i set off tracing each piece suuuuuupeeeerrrrr carefully. the pattern has 3/8" SA, so there isn't much room for error. overall the directions are very good and i didn't need many changes. she wanted a skinny pant so i narrowed the legs in for a custom fit. hey, every kid needs custom fit pants, amiright? i started out by cutting a straight leg so i could taper as needed. i ended up taking in the seams by about 3/8" below the hip, and 5/8" from the knee down.

other changes were pretty minor. i added one of those little change pocket things, which i stitched onto the facing before assembling the front pockets. i made up a separate fly facing instead of the folded in variety, and cut a separate inner and outer waistband. i feel both of these are sturdier when cut separate instead of just folded. the pattern has a seam at the CB of the waistband, i'm not sure if this is just to save fabric or what. the waistband is a straight rectangle, so if/when i make her another pair i'll eliminate the back seam.

i topstitched throughout to mimic RTW and even added a regular jeans hammer it in shank button. i don't have pics of the shank button because initially i had sewn on a regular button because she was so eager to wear them and i hadn't bought a jeans button yet. the shank button makes all the difference in the world for that real look. plus you get to hammer stuff. which is fun. next time i think i'll try rivets too.

she wanted a lightning bolt design for the back pocket because she is a huge fan of the "percy jackson and the olympians" series (one is entitled: "the lightning thief"), not to mention harry potter.
i thought i would give you a comparison between these and a RTW pair. she usually wears an 8 slim, so i decided to make a size 7. in retrospect, i should have cut the waistband and length in size 8, then slimmed down to a 7. they're long enough for her, but an extra inch wouldn't have hurt!
so here they are next to a 7 slim skinny jean from old navy. it looks like the sizing would be very consistent with RTW, though the waist may be a tad snug by comparison.

the only thing that really bugs me is the giant back pocket. see how much larger it is than the ON jean? HUGE! i didn't even think about this before stitching it on. i will definitely make a smaller pocket next time.

after this i feel pretty confident to make some jean-like pants of my own. i'll want to alter some of the SA's for a proper flat fell in places, but overall this is a really nice pattern. call me crazy, but i've been oogling over all the floral/patterned skinny jeans for spring. it's hard to track down floral stretch twill in a pant weight, but i finally found some online at mood... if i feel daring enough, i'm tempted to make my own!
—lisa g.

i set off tracing each piece suuuuuupeeeerrrrr carefully. the pattern has 3/8" SA, so there isn't much room for error. overall the directions are very good and i didn't need many changes. she wanted a skinny pant so i narrowed the legs in for a custom fit. hey, every kid needs custom fit pants, amiright? i started out by cutting a straight leg so i could taper as needed. i ended up taking in the seams by about 3/8" below the hip, and 5/8" from the knee down.

other changes were pretty minor. i added one of those little change pocket things, which i stitched onto the facing before assembling the front pockets. i made up a separate fly facing instead of the folded in variety, and cut a separate inner and outer waistband. i feel both of these are sturdier when cut separate instead of just folded. the pattern has a seam at the CB of the waistband, i'm not sure if this is just to save fabric or what. the waistband is a straight rectangle, so if/when i make her another pair i'll eliminate the back seam.

i topstitched throughout to mimic RTW and even added a regular jeans hammer it in shank button. i don't have pics of the shank button because initially i had sewn on a regular button because she was so eager to wear them and i hadn't bought a jeans button yet. the shank button makes all the difference in the world for that real look. plus you get to hammer stuff. which is fun. next time i think i'll try rivets too.
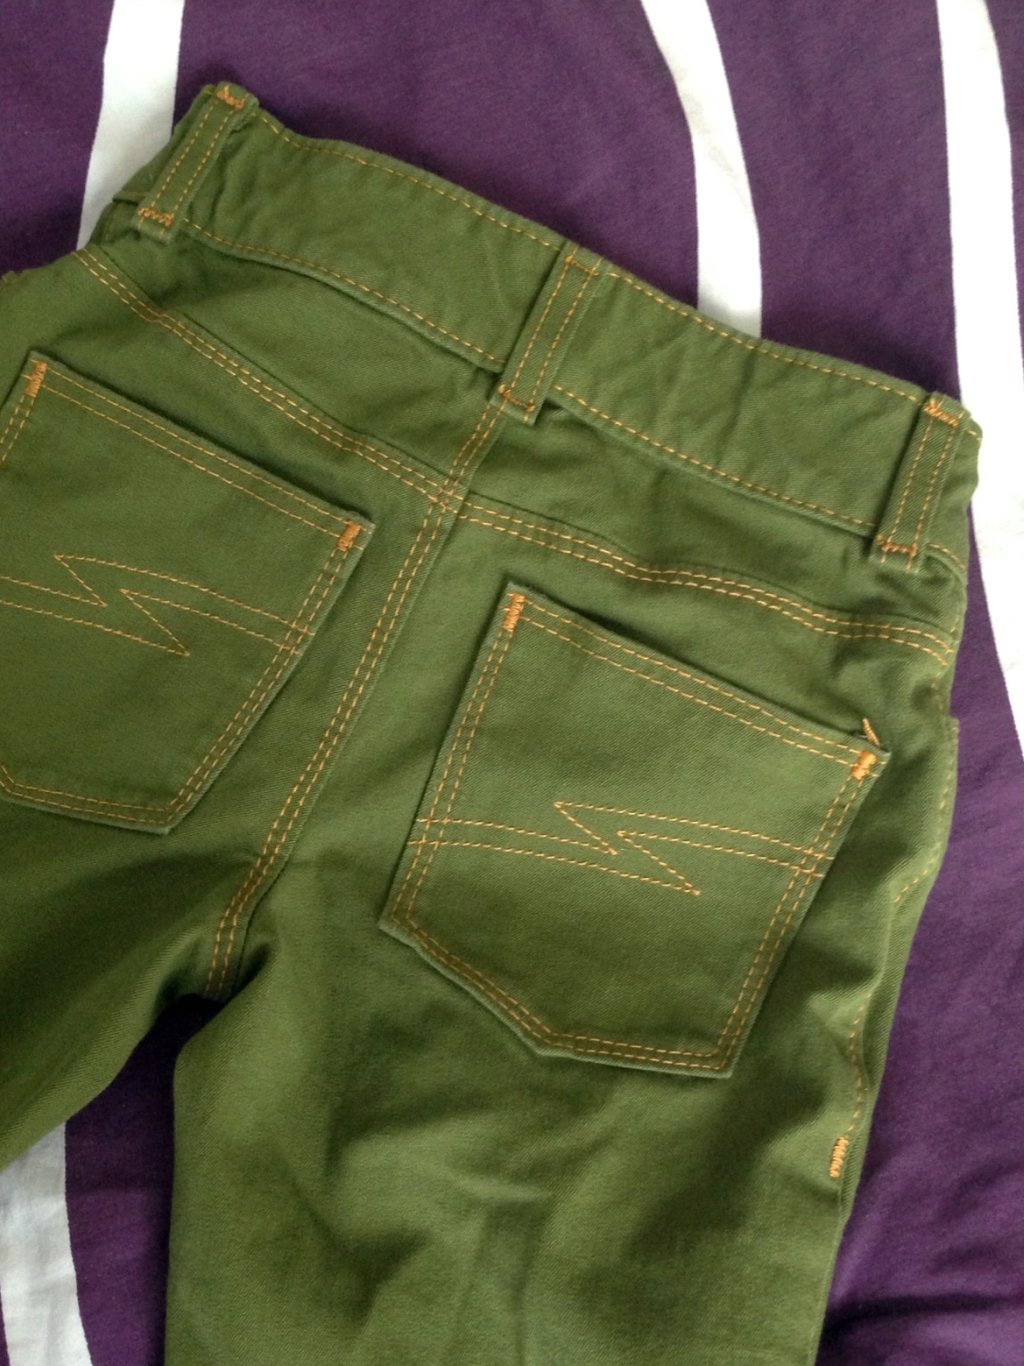
she wanted a lightning bolt design for the back pocket because she is a huge fan of the "percy jackson and the olympians" series (one is entitled: "the lightning thief"), not to mention harry potter.
i thought i would give you a comparison between these and a RTW pair. she usually wears an 8 slim, so i decided to make a size 7. in retrospect, i should have cut the waistband and length in size 8, then slimmed down to a 7. they're long enough for her, but an extra inch wouldn't have hurt!
so here they are next to a 7 slim skinny jean from old navy. it looks like the sizing would be very consistent with RTW, though the waist may be a tad snug by comparison.

the only thing that really bugs me is the giant back pocket. see how much larger it is than the ON jean? HUGE! i didn't even think about this before stitching it on. i will definitely make a smaller pocket next time.

after this i feel pretty confident to make some jean-like pants of my own. i'll want to alter some of the SA's for a proper flat fell in places, but overall this is a really nice pattern. call me crazy, but i've been oogling over all the floral/patterned skinny jeans for spring. it's hard to track down floral stretch twill in a pant weight, but i finally found some online at mood... if i feel daring enough, i'm tempted to make my own!
—lisa g.
Subscribe to:
Posts (Atom)