THIS BLOG HAS MOVED!

for the time being i will keep my old posts here at blogger, but i have imported all content to wordpress. please don't abandon me! to stay updated, head on over to my new space and follow me there. thanks!

—lisa g.

Saturday, November 26, 2011

i came. i saw. i doorbusted.

just not necessarily in that order...


i'm pretty anti-doorbuster. the thought of spending thanksgiving day plotting out how to spend money we don't have and getting up super early to spend said lack of money is just not me. i hate crowded stores. i'm too passive to be that lady who will push past people to grab the last tickle me elmo doll. (okay, i have kids but i really don't keep up on what the latest fads are because i avoid buying toys i will just get annoyed at having to pick up and put away later. don't worry, my kids aren't deprived. they have more playthings than they can handle.)


but sitting in my pj's friday morning combing through the hundreds of ignored email ads, i found a not to pass up deal: a dressform. i reeeaaally needed a dressform and this price was just too good. full price, i'd feel like it's something of a  rip-off. half price... far more tempting. so, tired of trying to fit dresses without one, i finally splurged. yay for me!


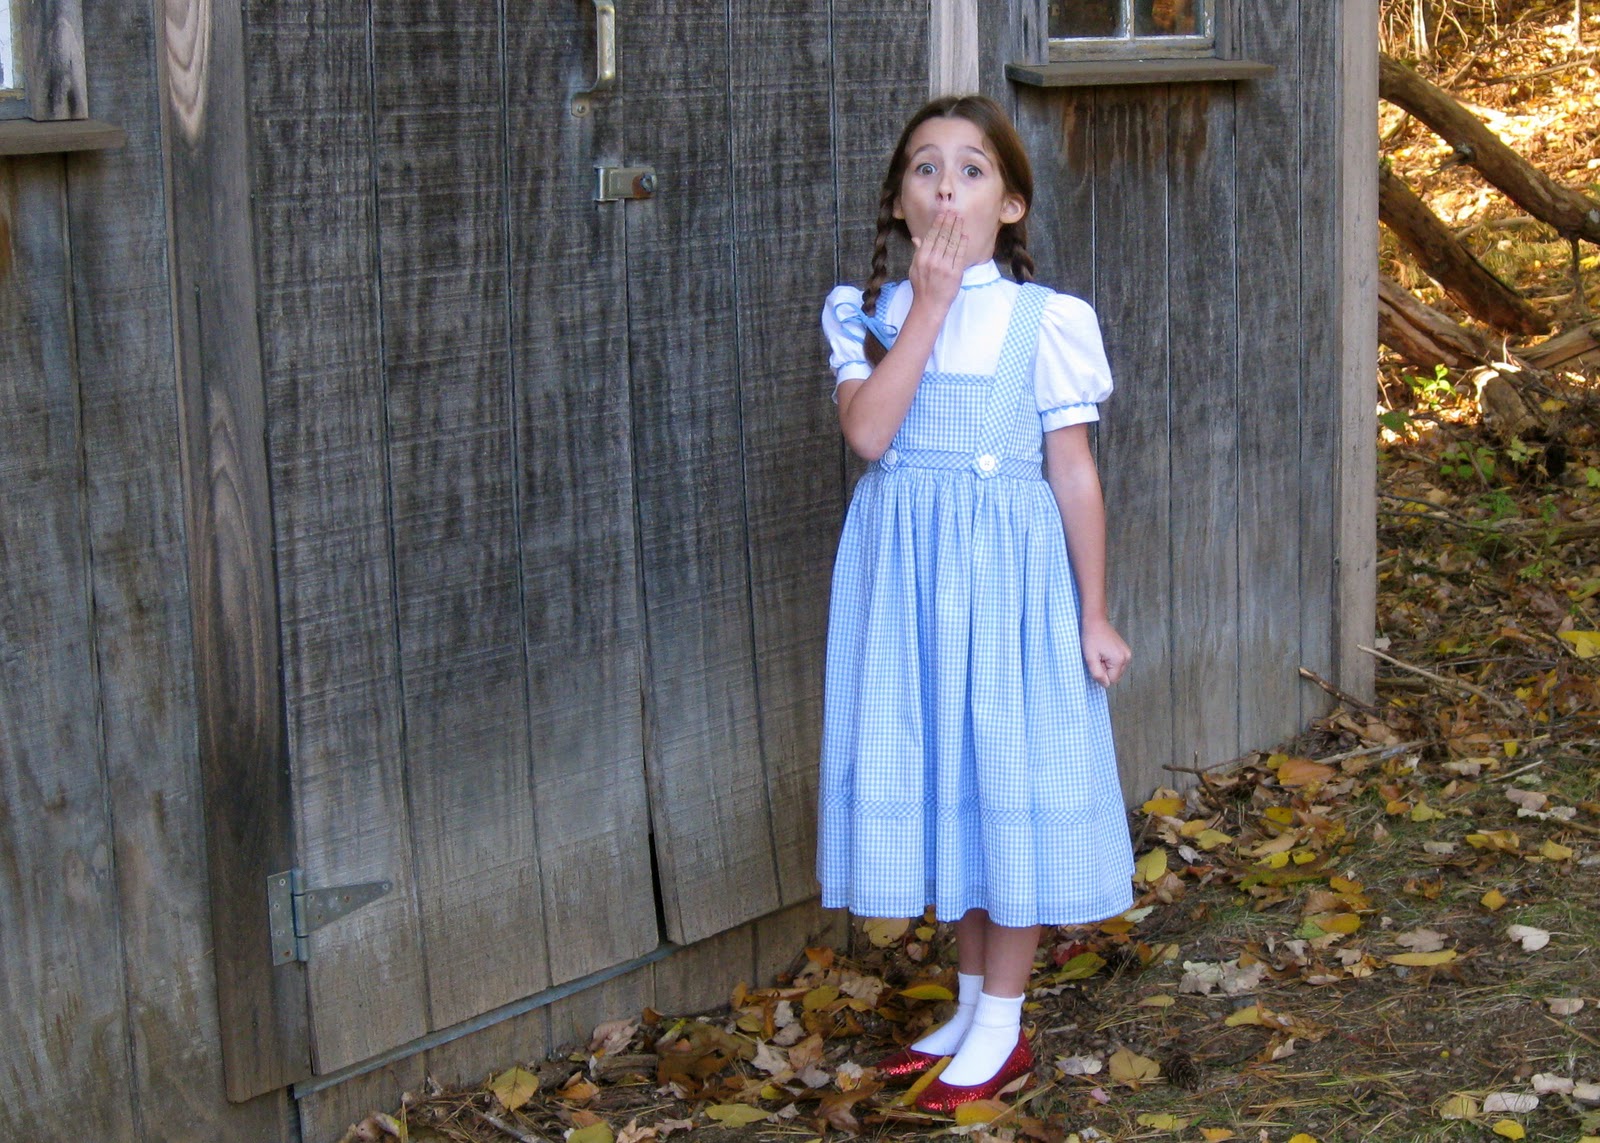
here she is, modeling the second dress i ever made (for myself). now she just needs a name...


Tuesday, November 22, 2011

corduroy skirt finished!

i finished the corduroy skirt last week and i'm moderately happy with the results! i started out with burdastyle's linda skirt pattern. the pattern as printed is more of a 3/4 circle skirt. i tweaked the pattern down to a half circle and adjusted the waist and hemline to accommodate. i then added a placket for 12 buttons down the front, pockets and belt loops.


so here is the skirt, complete with a windy day and 5 year old as my photographer...


sorry if the pictures aren't great. she can't hold still more more than half a millisecond.


i do wonder if the corduroy is just too heavy for the shape of the skirt, it doesn't seem to drape quite naturally. like i said, i made it a half circle skirt and thank goodness i didn't attempt fuller!! i am considering cutting down the sides to more of an A-line shape. it may not be worth the extra work, though i think perhaps i would wear it more that way. in the future i'll save the circle skirts for lighter weight materials for sure!


maybe i'm wrong though... thoughts? comment below!! no worries, i don't need to be told something is awesome all the time. it won't crush my spirits.

Thursday, November 10, 2011

11|11|11 corduroy appreciation day!!!

i've been working on this skirt. it's a half circle skirt made out of green 14 wale corduroy. i will have buttons down the front and pockets. i've thought it would be useful to have a more "everyday but cute" item in my closet and thought this would be it for my fall wardrobe. so, what's wrong? i really don't know. i've attached the waistband and i held it up to me and was struck with how bland and plain it looks.


hmmm...


here i was trying to do something i haven't really done before, and that's pick a solid color! something practical and cute that i could get lots of use out of but right now, it's just looking... flat.


maybe i've rushed to judgement. maybe attaching the buttons will pull it together. maybe i've always hid behind loud prints because i'm not confident enough to make something in a solid color. ack! plagued with self-doubt!


please excuse my unfortunate choice in wearing this top with
a green skirt... can we say "holiday elf" anyone? also the hem is
just pinned up, it won't look all weird and stiff once it's
properly sewn!


okay, perhaps i exaggerate. maybe the world won't end if i'm just not happy with the result. maybe i need to complete it before i judge. maybe i'm annoyed by other things in life and am misdirecting my disappointment and just wanted a moment of wow! i'm gonna love this!!! sigh. i'll be back with more on this later.


thoughts anyone?


P.S. in full disclosure—i bought my first piece of corduroy completely unaware that 1.) corduroy appreciation day even existed (every november 11th) and that 2.) this year was the mother of all corduroy appreciation days! maybe such coincidences will bring me good fortune to complete the skirt and still love it? perhaps... perhaps... perhaps...

Tuesday, November 8, 2011

bumpy robe

i've kinda been on a sewing binge lately. it started with the four halloween costumes (halloween, by the way was delayed for five days due to a ridiculous freak snow storm dropping 10"+ in our area and knocking out power for days!!), then i made a simple top for myself (sorbetto... what else?), then i made a dress for my izzie bee's 4th birthday, then i made a birthday gift for my big sister... all within about four weeks. hmmm... dare i say that i need a break from sewing? ha ha ha ha!!!! okay, just kidding there.


so i'll start with the robe i made for my big sister, jessica for her birthday. i know, i know, a robe sounds awfully unglamorous. don't worry, she'll love it. she's always cold! seriously! it'll be the middle of summer and her fingernails and lips will be blue. i wish i got her ability to be cold all the time, i'm always burning up like a furnace. anywho... i've made robes for my kids over the years and they seem to be loved and admired by all. i always hear: "oooh, do they come in adult sizes too?" so here is my first run at an adult sized bumpy robe.


yes, bumpy. have you seen these minky fabrics? they're super soft and the bumpy version is extra cuddly. i line them in soft flannel and my kids tell me they are fabulously cozy! also, i recently acquired a serger as an early birthday gift (yaaayyy!!!!) so i had a fast and easy way to finish all my seams!


ever wonder why robes are so expensive? probably because they take miles of fabric. doubled up for lining... i now understand why they are so pricey. over four yards of the minky and almost six yards for the 45" wide flannel lining. yikes! i actually had to clear and clean the living room floor and use that as my cutting surface. (yay for hardwood flooring!)


this was just the minky. the flannel was even longer!


first off, minky is thick and it makes a mess when you cut it. the flannel also creates a ton of lint in the sewing machine so it's is super crucial to clean out your machine many times during a project using these types of fabrics. a can of spray air is extremely useful here.


the thick nature of the minky makes it difficult to mark those little circles for sleeves and pocket placement, so i like to use tailor's tacks. this is a quick and handy way to mark any fabric, particularly the difficult ones. here's how to do it:


after your fabric is cut but while the pattern is still pinned to the fabric, take a hand sewing needle and thread it with a contrasting color that will be highly visible on the fabric. pull the needle all the way to the middle of the thread so you end up with a double strand.


poke the needle through the marking all the way through the material and pull the needle to the other side.


leave about an inch of thread on the top side of the material then cut the thread leaving about an inch hanging from the bottom side. do all the markings for the pattern piece like this.


sorry about all the weird shadows, it was very sunny and
i'm not talented enough to edit it out of my pictures!


once they are all marked, unpin the pattern and remove it from the fabric. the thread should just fall through the tissue without any issue (hee hee... i rhyme all the time... too much dr. seuss perhaps?). then, carefully separate the two layers of fabric and snip the thread in the middle so that each piece has two threads sticking through it.


this is such a simple accurate way of marking, i rarely use any other method even on fabrics that take marking easily. the tailor's tacks show up on both sides of both pieces of fabric with minimum effort. try it once, you'll be a convert.


really the most difficult part to making an adult sized robe is the fabric cutting. after that, it sews up very quickly. faster if you aren't lining it, of course. and here is the finished product!


the facing was hand stitched to the lining allllll the way around.
it took hours... and produced some serious hand cramping!


the lining makes a nice contrasting touch at the cuff, the tie belt as well as the insides of the pockets.


one side of the tie is bumpy, the other flannel

jumbo sized pockets! yay!


of course i had to wear it a while (you know, to take pictures and whatnot and i had to make sure it worked okay...), and oh is it so very cozy! i hope she'll spend many cold evenings snuggled up in it this winter. add a cup of coffee or a mug of cocoa... i so need one of these for myself. i have a feeling more minky and flannel will show up on my doorstep as my other siblings que up in line for one of their own... just a hunch. ;-)

Thursday, October 27, 2011

last costume!!!

last but not least... costume number four!


okay, i think after my sewing marathon of trying to finish these costumes as fast as possible i started to go a little crazy and get kind of exasperated with simplicity's children's patterns and their bizarre fit. however, i will not rant. i did plan on adding useful tips and whatnot throughout the costume posts so they weren't a complete bore, but i ended up chucking the camera to the side (or losing it under a pile of fabric) and just went for the finish line. i barely stopped to eat, let alone snap pictures so, my apologies if i am boring you!


anyway, my eldest daughter anastasia who is 7 years old, is dressing as dorothy from the wizard of oz. if you don't know, i grew up in kansas and lived there until after college and i've always wanted to dress up one of the girls as dorothy. you know, because everyone in kansas lives on a farm and watches their houses get picked up and blown around by tornadoes every spring. i'm kidding. sort of... completely independent of my kansas roots, i just happen to love this move.


i used simplicity 4139 which really is a nice replica from the movie. i chose to disregard the directions which had you sew the faux blouse and faux jumper together at the side seams and shoulder seams. it was kinda weird. i mean i get it, it's a costume, but i couldn't quite do it that way. so i left the blouse and jumper independent of each other except  at the waist and center back. i didn't want to mess with two separate closures or two entirely separate pieces so that's what i went with.


again, like the snow white pattern, this is cut for a curvy figure! my daughter perfectly matched up to the waist and chest measurements of the size 5 (she's tall and skinny) yet after trying it on her i still had to take a full 2" out of the top of the bib pieces. weird. anywho... 


i'm really happy with the results and of course, she loves the outfit! the kids can't wait for halloween, let's just hope it isn't freezing! right now it's 40 degrees and we're supposed to get snow tonight. why can't halloween be in september or something?


so now that i'm done with all that i can start tackling everything that i neglected while i was sewing. like my children, laundry and general housekeeping. oh, and all the other sewing projects i have lined up!


have a safe and fun halloween!

Tuesday, October 25, 2011

vote for me! vote for me! vote for me!

okay, shameless plug here... i entered the bee costume i made into the burdastyle.com costume contest. i know there are some fabulous and creative costumes entered, but if you have a minute hop over there and throw in a vote for mine! there are prizes involved so that'd be awesome, however unlikely. thanks!


vote here: buzz!


VOTE HERE!!!

Saturday, October 22, 2011

heigh-ho... heigh-ho...

next up in the halloween costume department is my 5 1/2 year old daughter sylvia and the little man of the house, 2 1/2 year old oliver.


sylvia is our reigning princess, fashionista, diva, you name it. i've always thought she would make a cute snow white so that's what we did this year! i used simplicity 2563 which was great because i didn't have to make any design changes. i used this pattern last year for the cinderella look so i knew i'd have to make a few adjustments. i don't know why but the cut straight off the pattern is so curvy! as in tiny at the waist and tapered out at the chest. now, my kids aren't particularly busty (???) so i fit the pattern at the chest and brought it out at the waist. also the neckline is cut really low so i raised it by a full inch. doesn't someone test these things out first? i mean, really! busty and low cut for a toddler pattern??? c'mon. fortunately i knew all that going into this dress so i could make the adjustments ahead of time.


i used a basic acetate satin, same as the bee, in fact. since it is a little thin i underlined and lined the bodice. not trying to go all crazy on this one, but i wanted the point at the front of the waistline to stay in place so since i happened to have a small piece of boning laying around, i put a strip of it down the center front. yes, i know, a 5 year old doesn't need boning in a costume... but it always bugged me about the cinderella dress i made last year. the point kinda sticks out and without support this would have done the same. don't judge me, i'm not crazy. oh, wait...


i lined the skirt with taffeta to give it some body and up the "swish" factor. i hand stitched the yellow bodice lining, made the detachable collar and red headband... this dress has far more details than i realized when i started it so it definitely takes a while to put together. but, it is a great snow white replica so i won't complain. some of the patterns out there are way off base! i do kinda wish i had done the bodice in a navy velveteen or something, but as i will never make this dress again(!!!) i'm not going to dwell on it.


so after all that we thought it would be cute to dress oliver up as dopey to go along with the snow white costume. he was originally going to be something completely different but after an afternoon of mad searching and being unable to find a very key piece... i had to come up with something else. his favorite color is green and he has a speech delay so he doesn't talk much, and since dopey doesn't talk at all... well it's a match made in heaven. he's shy, so he'll probably do a lot more nodding than talking anyway!


this one i pretty much drafted myself. i had a robe pattern that was several sizes too small so i used that as a starting point. the great thing about a dopey costume is that his outfit is huge and disheveled so i really had no need to go crazy about fitting anything! i made it out of fleece for comfort and warmth (and it was 60% off at the fabric store, bonus!). i resisted the urge to line the outfit and simply went au natural on the inside. i barely even trimmed my seam allowances. i sewed big buttons down the front but used velcro on the inside for the actual closure. typically i'm against fake closures, but if you've ever tried to button up a wiggly 2 1/2 year old, you'd know that this was the most appropriate option. i hand stitched patches on the elbows and whipped up a slouchy purple fleece hat. throw on a belt and there you have it!